|
Headlight Disassembly and Cleaning |
Article Date: 01-27-05
Author:
Turtleboy
Mod Class: Z32 - All Models
Mod Type: Maintainence
Article Origin:
http://www.skylinedesigns.net/
Difficulty Level:
5
(Scale of 1 to 10. 1 being extremely easy, 10 being extremely
difficult.)
Estimated Time to Complete: 4+ hours + dry time
Tools Required:
Various Phillips Head Screwdrivers
Large and Small Flat Head Screwdrivers
Heat gun, or large oven
Glass Cleaner
Clean Cloth (surgical rag or camera lens wipe works well)
RTV Clear Silicone Sealant (optional)
Thin light weather stripping (optional)
Fine Paint Brush (optional)
Your choice of spray paint (only if you wish to paint the housing) |
Taking apart your Headlamps: The main reason for doing
this would be to clean a fogged/dirty projector lens or to paint the inside of
your headlight housing. This guide assumes you already have you headlight
removed from the car, if you need information on how to remove the headlight
from the car, click
here.

Headlamp Disassembly
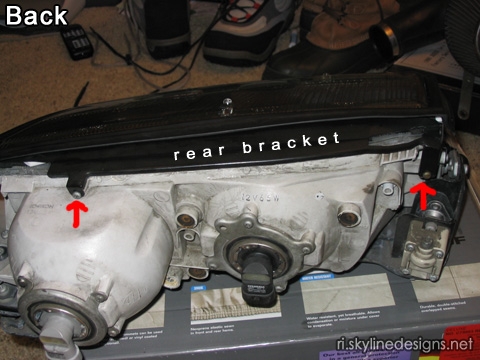
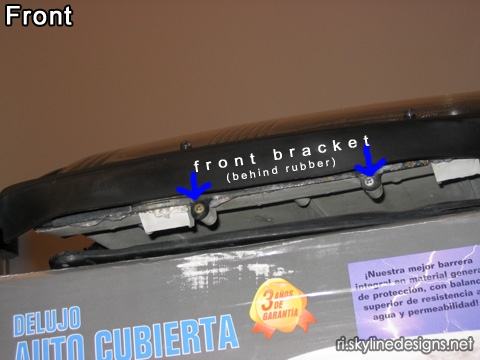
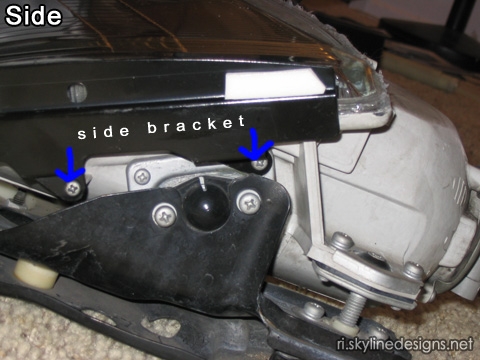
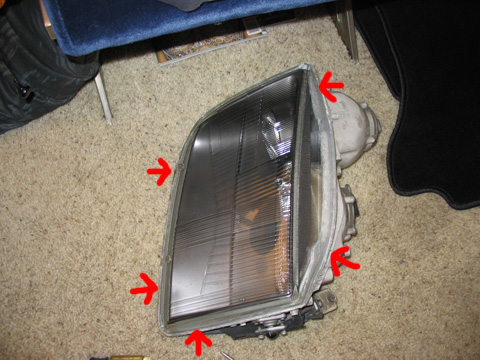
1. First, there are 8 screws (2 per side) holding 4 metal brackets (1 per
side) that hold the rubber outter lining of the headlight assembly on. The first
step is to unscrew all eight screws. (the side brackets are similar hence the
reason for only one side picture)
2a. After all of the screws have been removed, pull off the rubber w/ the
brackets. There is some foam padding and padded tape in between the rubber so
the brackets may just stick to the rubber and come out in one piece. I found
that most of the padding deteriorated, but that will be addressed later. The
point this step is, if you want to take the brackets from the rubber you can,
but it is not necessary. I did, to clean everything and replace the foam, which
I will explain in the re-assembly.
2b. Do not worry about getting the brackets mixed up, all the ones for
the right headlight have an "R" on them and all the left ones have an "L" on
them and since they will only fit in the place they are meant go, you will not
get them mixed up. Also, there are two bent rubber hoses on each headlamp (one
on the side, one on the back), be sure to remove those before heating, and to
put back in place before reinstalling the headlamp on your car.
3. There are 5 metal brackets holding the glass to the plastic housing on
each headlight. They all need to be removed, but be careful when doing so; there
is a small lip on the glass holding them in place, it is easy to chip or crack
the glass at that point while pulling these off. (The second pictures already
has them removed)
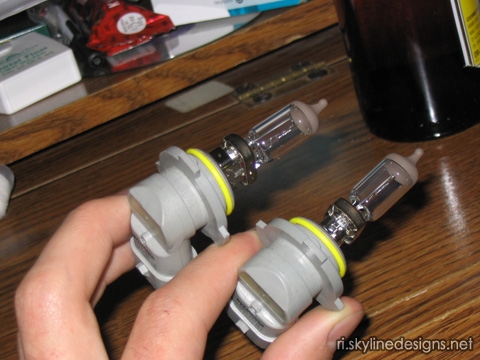
4. Remove the light bulbs (twist and pull out carefully), careful not to
touch the glass with your hands. The oil from your hands will create "hot spots"
on the glass and that can cause them to burn out prematurely. If you do happen
to touch them clean them with a clean rag and rubbing alcohol.
5. Now is the part where you have to soften the glue holding the glass to
the housing via heat. You basically have two options:
a) Use a heat gun if you have that available. Turn on the gun and go
around the edges of the housing where the glue is several times until the glue
becomes soft. Becareful not to heat up the housing too much in one spot, as you
do not want to melt any of the plastic.
b) Heat your oven up to 200 degree F. Put the healight into the oven
making sure it is not touching any of the sides or the top of them oven (you do
not have to worry about the bottom since it is mounted to a metal plate, but if
you like, you can put it on a cookie sheet). Once it is in the oven turn up the
heat to 250 degrees F and leave it for 10-15 minutes, checking it regularly; do
not just leave it in for 15 minutes and come back, you do not want your entire
housing to melt. If the glue is still not soft enough you can leave it in for
longer, but remember to watch it closely.
6. Once the glue is soft you can take the glass from the housing. To make
the job easier you can use a small to medium size flat head screw driver to pry
the two apart. Do not pry too hard as you are pushing against glass, just enough
so you can get some grip on glass with your hands. I found using a razor blade
to "cut" some of the glue helps as well. If the glass just will not come off,
the glue probably just is not hot enough, so you will need to reheat it.
7. Once you get the glass off, you need to make a decision, whether the
glue is in good enough shape to just re-heat and put the glass back on when
reassembling OR if you have (or want) to chip/peel the old glue off to replace
with RTV Silicone. If you decide to chip off any of the old glue, now is the
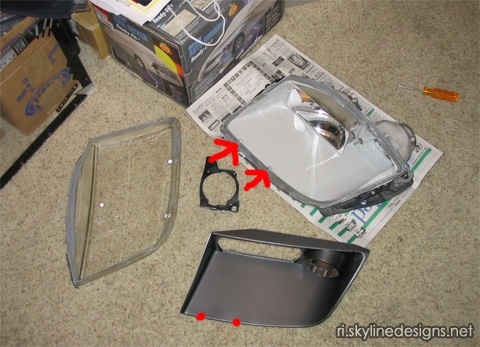
time to do it. Other than that, Now you need to take the black part (the part
visible behind the glass when they are mounted on ther car) of the housing. It
is attached by two screws on the front, similar to the ones that held the
brackets on in step 1. Once those screws are undone you can take off the black
part, there is a bit of padding on one side of the headlight in between black
housing and the rest of the housing which may be pretty disenegrated, if it is
you can replace it with a small strip of weather stripping in its place, if not,
just put it back in place when you reassemble. (in the photo the housing has
already been disassembled, but the red arrows and dots point to where the screws
would be)
8. Now if you only wish to paint the housing your disassembly will end
here, paint the housing and go on to reassembly. If you want to clean the
projector (which is suprisingly dirty after 14 years) then you have a little
more to go. When cleaning the lens you have two choices. You can remove the
projector housing which makes the lens easier to clean; downside is you may have
to readjust the projector beam afterwards which can be a real pain. Or you can
clean the lens while it is still in the housing, meaning you dont have to
readjust, but it is a little harder to get it clean. If you opt for the latter,
clean the lens and begin reassembly.
9. The projector lens is held in by a metal bracket. The bracket is held
in by four screws and one adjustment screw. If you look at the projector from
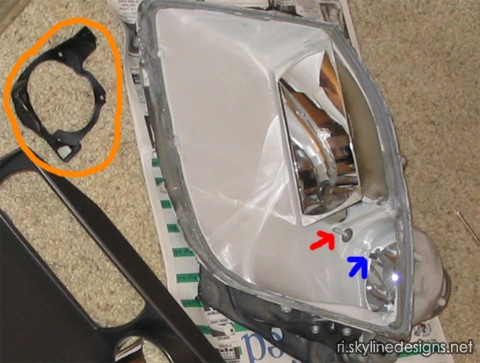
the front you can see the four screws at each corner of the bracket; (I did not
have a direct photo, but in the first picture, circled in orange is the bracket
that holds the lens [the lens is not present], the red arrow is pointing to the
adjusment screw, and the blue arrow is pointing to one of the four holes for the
other screws) unscrew those 4 screws first and take them out, but do not pull
the bracket out yet.
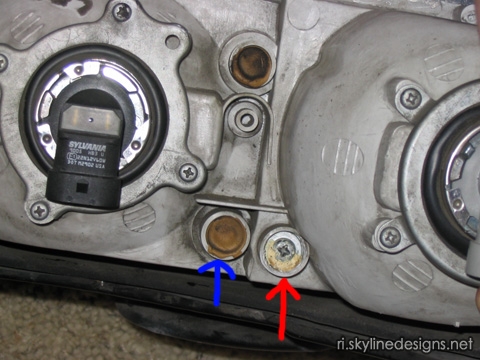
10. You now need to unscrew the adjustment screw while slightly pulling
the housing/lens out. You may find that the adjustment screw is covered by a
glue substance (such as the screw pointed to by the blue arrow). I used a screw
driver and razor blade to chip at the glue until I could seat the screw driver
into the screw to turn it (the red arrow shows the screw uncovered from the
glue). Now unscrew the adjustment screw while slightly pulling the housing/lens
out. The adjustment screw may be hard to turn, so be careful not to strip it.
You may also notice that the adjustment screw, screws into a peice of plastic on
the lens bracket, also be careful not to strip that plastic piece. Try to keep
an eye on where the adjustment screw is in relation to the bracket, and try to
screw it back in the same amount when reassembling, so there will be less chance
you need to adjust the projector later.
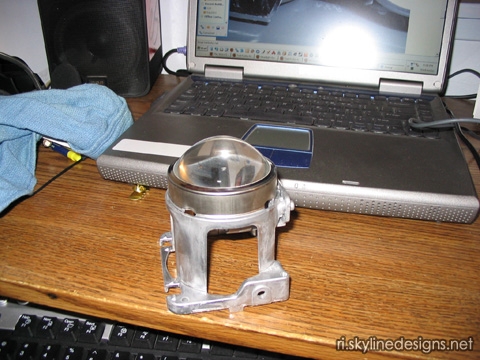
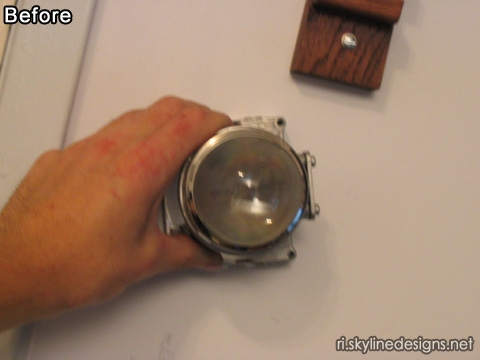
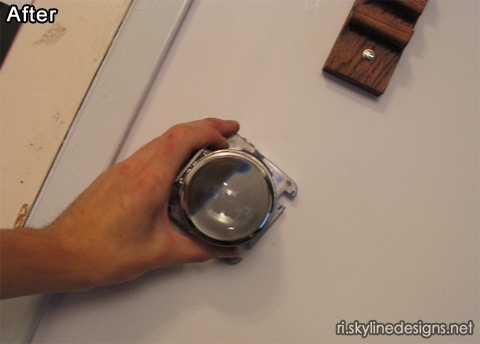
11. Now once you get it out, the lens housing will come out of the
bracket. It may not look to dirty but below are before and after pictures, you
can see the difference. I recommend cleaning it with glass cleaner and a
lintless cloth, such as a surgical rag or camera lens cloth. If you want, you
can also clean the chrome-painted reflectors on the housing, but do not use a
cloth or rag for this, as you may scratch the surface, or chip the chrome paint,
use a soft paint brush to brush off the dust instead.
Continue on Page 2
|